Skip to content
OnBinder
How-to 🇰🇷 South Korea

This content applies specifically to South Korea.

How to Distinguish Condensation, Waterproofing Failure, and Pipe Leaks in a Ceiling Leak

If you see water on the ceiling, first eliminate electrical hazards and record the conditions when it occurs and any changes in the water meter. Comparing its relationship with rain, humidity, and water use in different areas can narrow the diagnosis to condensation, exterior wall infiltration, bathroom waterproofing failure, or a pipe leak.

Listen or read this article

15:51

Listen, or read the text only.

How to Distinguish Condensation, Waterproofing Failure, and Pipe Leaks in a Ceiling Leak

Kokoro 82M AI-generated voice 16 min read

0:00 15:51

Advertisement

Download audio

File name
ceiling-water-leak-initial-inspection-en.mp3
Format
MP3 (audio/mpeg)
Duration
15:51
File size
10.9 MB
Engine
Kokoro 82M

This audio was generated by AI.

You may download and use it freely for personal use.

How to Distinguish Condensation, Waterproofing Failure, and Pipe Leaks in a Ceiling Leak

12 min read

How to Distinguish Condensation, Waterproofing Failure, and Pipe Leaks in a Ceiling Leak
If you see water on the ceiling, first eliminate electrical hazards and record the conditions when it occurs and any changes in the water meter. Comparing its relationship with rain, humidity, and water use in different areas can narrow the diagnosis to condensation, exterior wall infiltration, bathroom waterproofing failure, or a pipe leak.
If water has reached a light or nearby wiring, do not approach the wet area. Only if it can be done safely from a dry location, switch off the relevant circuit breaker or the main breaker.
Use photos and videos to record the time of the leak, weather, hot-water use, whether the bathroom or kitchen was used, and any changes in the water stains.
After stopping all water use, check whether the small dial or leak indicator on the individual water meter continues to move.
Compare whether the symptoms correlate with rain, humidity, water use in a specific area, or pipe pressure to narrow the cause to condensation, rainwater infiltration, the waterproofing layer, or a pipe problem.
Before any demolition, obtain diagnostic records that include thermal imaging, pressure, acoustic, and gas test results and measurement locations to confirm the cause and scope of repairs.
If water is dripping from the ceiling or a stain is spreading, occupants, tenants, and owners should all take immediate initial action. Water near light fixtures, fire detectors, or wiring requires immediate attention and is not an issue that should wait for a separate application deadline.
Prepare a mobile phone, a log for recording the time of the leak and the weather, the location of the water meter, and a list of water-using appliances and fixtures in the home. In a multi-unit residential building, notify the management office and the unit above, and tenants should also notify the landlord in a way that leaves a record. If there is a risk of electric shock, fire, or ceiling collapse, check the official guidance from the relevant emergency reporting authority and report it, and ask the management office or relevant authority about the appropriate channel for a general leak diagnosis.
1. Eliminate Electrical and Falling Hazards First
Safety checks come before locating the visible water.
· If water is dripping around a light fixture, switch, fire detector, or ventilation fan, do not touch the wet fixture or switch. · Turn off the relevant circuit breaker or main breaker only if the floor leading to the electrical panel and your hands are completely dry and you can operate it safely. · If the electrical panel itself is wet or you must step in water to reach it, do not approach it. Check the official guidance from the relevant emergency reporting authority, or contact the management office or an electrician. · Remove objects and keep people away from beneath a bulging or sagging ceiling. Waterlogged drywall may partially fall. · If a plumbing leak is strongly suspected and you can safely identify the valve, shut off the unit’s water valve. If the valve is unclear, do not attempt to operate it.
Drilling a hole in the ceiling yourself to drain the water may damage concealed wiring or pipes or cause ceiling material to fall. It is safer to have a professional inspect the electrical and structural conditions before performing the work.
2. Record the Conditions and Water Stains
The point where water appears on the ceiling may differ from the actual location of the defect. Water can travel along slabs, beams, pipe exteriors, and the inside of the ceiling, so immediately removing material based only on the center of the stain may cause you to miss the source.
Record the following items in chronological order.
· Date and time when first discovered · Whether it was raining, had stopped raining, or was windy · Whether the shower, bathtub, washbasin, sink, washing machine, or dishwasher was used · Whether the symptoms change when cold or hot water is used · Whether the air conditioner, boiler, or dehumidifier was operating · The water’s color, odor, temperature, and dripping rate · The direction in which the edge of the stain is expanding · Whether it overlaps with the location of the upstairs bathroom, kitchen, or balcony
Take repeated photographs from the same angle and under the same lighting, and include a reference object such as a ruler or tape to make it easier to compare the rate of spread. Also record video of the dripping water, conditions before and after water use, and the meter display.
Areas to Suspect First Based on the Conditions
Observed condition | Areas to check first | Why no definite conclusion can be made Occurs during or after rain | Roof·exterior wall·window joints·sealant·drains | Rainwater may travel along the structure and appear indoors later Occurs after showering or cleaning the bathroom floor | Bathroom waterproofing layer·drain joints·drainpipe | The water supply line is also used during the same period and requires a separate inspection Continues to spread even when no water is being used | Cold-water·hot-water supply lines, heating pipes, common pipes | Condensation or water remaining inside may also drip later Water droplets form over a wide area on cold surfaces or when humidity is high | Condensation, insulation defects, air-conditioning ducts·pipe insulation | A concealed leak may also have increased the surface humidity Becomes worse when hot water or heating is used | Hot-water pipe·heating pipe or condensation caused by temperature differences | It may occur simultaneously with waterproofing or drainage defects where hot water is used
3. Check for a Minor Leak Using the Water Meter
If the home has an individual water meter, it can provide useful information when checking whether a water supply pipe is leaking.
· Close all faucets in the home. · Wait until the toilet tank has filled, and stop the operation of any appliance that may use water, such as the washing machine, dishwasher, water purifier’s automatic water supply, ice maker, or bidet. · Check the product safety instructions before turning off the boiler or water supply equipment yourself. · Photograph the meter reading and the small indicator needle or leak indicator. · Do not use any water during this time. Observe it for a while, then photograph it again and compare any changes.
If the small indicator needle or reading continues to move, water may be flowing through a toilet, water-using fixture or appliance, or pressurized water supply pipe within the unit. However, this alone cannot determine the location of the ceiling leak.
You also cannot conclude that there is no leak merely because the meter does not move. Rainwater intrusion, condensation, bathroom waterproofing leaks, and drainpipe leaks may not register on the water supply meter. In buildings with shared metering or connected water tanks and booster equipment, check with the management office or the person responsible for the equipment.
4. Distinguish Among Condensation, Rainwater, Waterproofing, and Pipe Leaks
Signs Strongly Suggesting Condensation
· Small water droplets form over a wide area on a cold ceiling, at exterior wall corners, around windows, or on uninsulated pipes. · It becomes worse when indoor humidity is high or the temperature difference between indoors and outdoors is large. · It tends to decrease after ventilation or dehumidification. · It is often not directly associated with changes in the water supply meter.
Even if it appears to be condensation, a concealed leak inspection is needed if a stain at a specific point continues to expand or coincides with rain or water use. Simply wiping away mold and repainting may leave the source of the moisture unresolved.
Signs Strongly Suggesting Rainwater Intrusion Through an Exterior Wall or Roof
· It appears after rain or after strong winds drive rain against an exterior wall. · It often begins on the top-floor ceiling, where an exterior wall meets the ceiling, or above a window. · It may appear several hours or even longer after the rain stops. · Exterior wall cracks, window sealant, roof waterproofing, and areas around drains should be inspected together.
A water-spray test on an exterior wall may increase damage to lower floors and create electrical hazards, so it should be performed by a professional who divides the area into sections and provides drainage and protective covering.
Signs Strongly Suggesting the Bathroom Waterproofing or Drainage System
· The downstairs ceiling becomes wet after someone upstairs showers or uses a large amount of water on the floor. · It may respond to water use around the bathroom threshold, drain, bathtub edge, or pipe penetrations. · A waterproofing problem may occur even while the water supply meter remains stationary. · If it appears only when water is drained from the washbasin or bathtub, the drainpipe and connections should also be inspected.
A waterproofing flood test involves blocking the drain and monitoring the water level, but the test itself may increase damage to the floor below. The scope and duration should be determined by a professional after obtaining consent from the managing entity and the occupants below.
Signs Strongly Suggesting Cold-Water or Hot-Water Supply Pipes
· The stain may continue to expand or water may repeatedly drip regardless of whether water is being used. · The meter’s small indicator needle may move even after all water use within the unit has stopped. · A hot-water pipe leak may create a different temperature pattern from its surroundings in a thermal image, but surface temperature alone is not conclusive. · It may be accompanied by a drop in pipe pressure or repeated replenishment of boiler water.
Cold-water pipes, hot-water pipes, and heating pipes should be isolated from one another when checking pressure changes. Applying pressure without clearly understanding the pipe type and valve configuration may damage the equipment.
5. Review Inspection Methods and Diagnostic Records Before Construction
Each type of leak detection equipment looks for different clues. Rather than accepting an estimate that merely lists equipment names, it is important to confirm which pipes and areas were inspected and under what conditions.
Inspection | Primary role | Limitations and items to verify Thermal imaging inspection | Identifies areas where surface temperature differences and moisture movement are suspected | It does not photograph the leak itself and may be confused by insulation defects, sunlight, or heating and cooling effects Pressure test | Checks whether isolated water supply·hot-water·heating circuits maintain pressure | It can narrow down which circuit is leaking, but additional detection is required to identify the exact point Tracer gas inspection | Introduces tracer gas into an isolated pipe and searches for the area where it escapes | The pipe must be properly emptied and isolated, and finishing materials and ventilation conditions may affect the results Acoustic inspection | Detects leak sounds generated in pressurized pipes | Detection may be difficult depending on ambient noise, pipe material, burial depth, and minor-leak conditions Moisture meter inspection | Compares the relative extent of moisture in ceiling·wall finishes | Standards differ by material, and it cannot independently determine the cause and point of origin Flood·water-spray test | Reproduces conditions involving bathroom waterproofing or external rainwater intrusion | Uncontrolled testing may increase damage, so prior consultation and protective measures are required
Before agreeing to demolition or repairs, request the following records.
· Inspection date, weather, and leak conditions at the time · Units·rooms·pipe circuits inspected and valve locations · Initial and final meter readings · Circuit tested, initial value, final value, and observation conditions for the pressure test · Original thermal images and shooting locations · Floor plan or photographs showing the locations of acoustic·gas inspections · Diagnostic opinion that distinguishes confirmed facts from assumptions · Minimum demolition scope, restoration scope, and conditions that may result in additional costs · Post-repair retesting method and whether records of the results will be provided
Do not decide to demolish an entire bathroom or extensively replace pipes based on a single equipment signal. If multiple causes are suspected, the water supply pipes, drainpipes, waterproofing layer, and external intrusion should be isolated by area and separately reproduced.
6. Preserve Evidence for the Management Office, Landlord, and Insurer
The cause of and responsibility for a leak are not determined solely by where the water appears. An investigation is needed to determine whether the defect is in privately owned piping, common piping, the exterior wall or roof, or the upstairs unit’s equipment.
· Notify the management office of a multi-unit residential building of the time the leak was first discovered, the hazardous location, and the upstairs unit’s usage conditions. · Tenants should notify the landlord in writing or by message with photographs and leave a record of the emergency measures taken. · Rather than blaming the upstairs occupants, ask them to confirm when the bathroom·kitchen was used and request a joint inspection. · If an insurance claim may be possible, contact the insurer before demolition to report the incident and ask which photographs and documents are required. Do not delay emergency safety measures, but photograph the conditions both before and after demolition. · Keep receipts for diagnostic costs, emergency measures, repairs, drying, and restoration separately.
Coverage, deductibles, and the distinction between the cost of repairing the source of the leak and the cost of restoring the damage vary by policy. Do not assume that compensation is available merely because insurance exists; review the policy terms and the insurer’s incident-reporting guidance.
7. Items to Check Even After the Water Stops
Even if the water is no longer dripping, the inside of the ceiling may not be dry. Concealed moisture can lead to damage to finishing materials, odors, and microbial growth.
· Confirm whether the same conditions were recreated for retesting after the cause was repaired. · Check whether wet insulation and ceiling materials need to be replaced. · During drying, record moisture measurements and measurement locations by date. · If mold has spread widely or contaminated water was involved, consider a professional assessment rather than simply wiping it with a dry cloth yourself. · Proceed with painting and wallpapering only after confirming that the cause has been repaired and the area is sufficiently dry.
A ceiling leak may involve condensation and leakage at the same time, or defects in both the waterproofing layer and piping. Even if the symptoms disappear after a single surface repair, the original conditions should be recreated to determine whether the problem recurs.
0:00 0:00
1 / 52

Advertisement

Download text

File name
ceiling-water-leak-initial-inspection-en.txt
Format
TXT (text/plain)
Paragraphs
52

Downloads exactly what you see as a text file.

Please cite the source when quoting.

Large text

Makes the text larger and the colors clearer. Turn it on if the text feels too small.

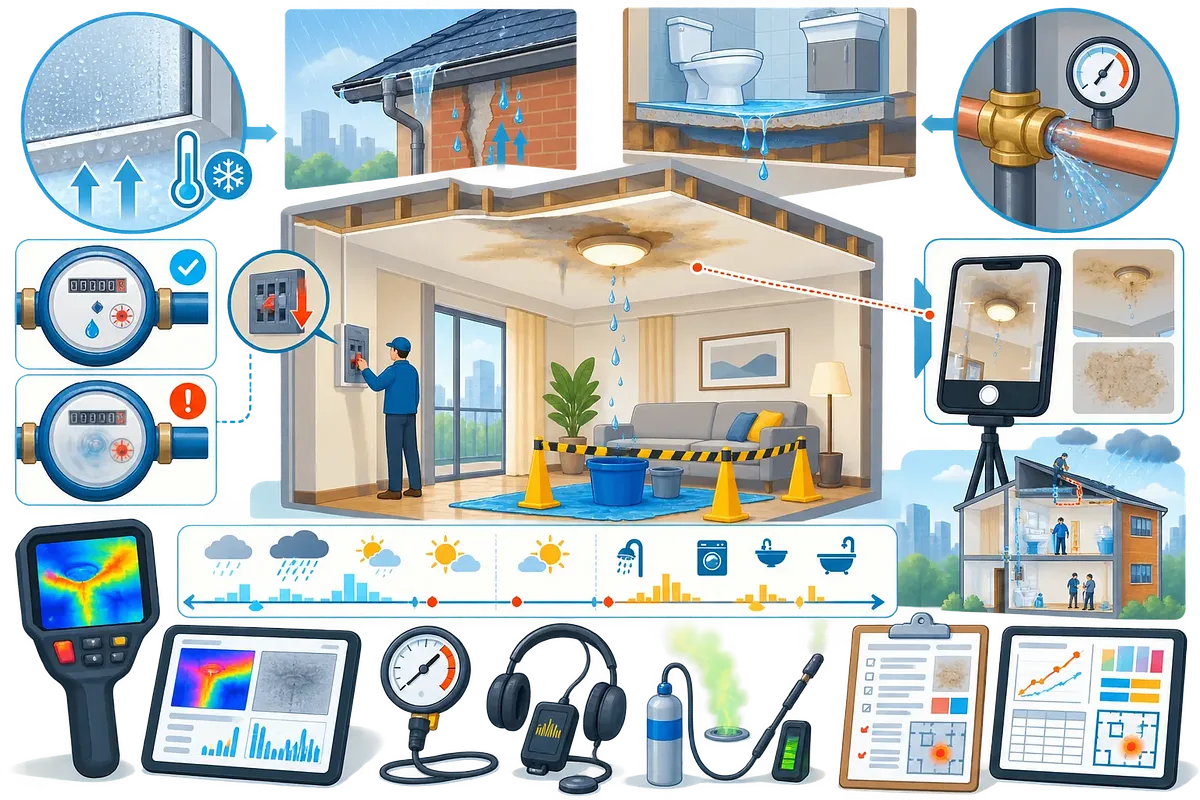
A man inspects the breaker panel while water leaks through the ceiling around a light fixture.

Key points

  • If water has reached a light or nearby wiring, do not approach the wet area. Only if it can be done safely from a dry location, switch off the relevant circuit breaker or the main breaker.
  • Use photos and videos to record the time of the leak, weather, hot-water use, whether the bathroom or kitchen was used, and any changes in the water stains.
  • After stopping all water use, check whether the small dial or leak indicator on the individual water meter continues to move.
  • Compare whether the symptoms correlate with rain, humidity, water use in a specific area, or pipe pressure to narrow the cause to condensation, rainwater infiltration, the waterproofing layer, or a pipe problem.
  • Before any demolition, obtain diagnostic records that include thermal imaging, pressure, acoustic, and gas test results and measurement locations to confirm the cause and scope of repairs.

If water is dripping from the ceiling or a stain is spreading, occupants, tenants, and owners should all take immediate initial action. Water near light fixtures, fire detectors, or wiring requires immediate attention and is not an issue that should wait for a separate application deadline.

Prepare a mobile phone, a log for recording the time of the leak and the weather, the location of the water meter, and a list of water-using appliances and fixtures in the home. In a multi-unit residential building, notify the management office and the unit above, and tenants should also notify the landlord in a way that leaves a record. If there is a risk of electric shock, fire, or ceiling collapse, check the official guidance from the relevant emergency reporting authority and report it, and ask the management office or relevant authority about the appropriate channel for a general leak diagnosis.

1. Eliminate Electrical and Falling Hazards First

Safety checks come before locating the visible water.

  1. If water is dripping around a light fixture, switch, fire detector, or ventilation fan, do not touch the wet fixture or switch.
  2. Turn off the relevant circuit breaker or main breaker only if the floor leading to the electrical panel and your hands are completely dry and you can operate it safely.
  3. If the electrical panel itself is wet or you must step in water to reach it, do not approach it. Check the official guidance from the relevant emergency reporting authority, or contact the management office or an electrician.
  4. Remove objects and keep people away from beneath a bulging or sagging ceiling. Waterlogged drywall may partially fall.
  5. If a plumbing leak is strongly suspected and you can safely identify the valve, shut off the unit’s water valve. If the valve is unclear, do not attempt to operate it.

Drilling a hole in the ceiling yourself to drain the water may damage concealed wiring or pipes or cause ceiling material to fall. It is safer to have a professional inspect the electrical and structural conditions before performing the work.

2. Record the Conditions and Water Stains

The point where water appears on the ceiling may differ from the actual location of the defect. Water can travel along slabs, beams, pipe exteriors, and the inside of the ceiling, so immediately removing material based only on the center of the stain may cause you to miss the source.

Record the following items in chronological order.

  • Date and time when first discovered
  • Whether it was raining, had stopped raining, or was windy
  • Whether the shower, bathtub, washbasin, sink, washing machine, or dishwasher was used
  • Whether the symptoms change when cold or hot water is used
  • Whether the air conditioner, boiler, or dehumidifier was operating
  • The water’s color, odor, temperature, and dripping rate
  • The direction in which the edge of the stain is expanding
  • Whether it overlaps with the location of the upstairs bathroom, kitchen, or balcony

Take repeated photographs from the same angle and under the same lighting, and include a reference object such as a ruler or tape to make it easier to compare the rate of spread. Also record video of the dripping water, conditions before and after water use, and the meter display.

Areas to Suspect First Based on the Conditions

Observed condition Areas to check first Why no definite conclusion can be made
Occurs during or after rain Roof·exterior wall·window joints·sealant·drains Rainwater may travel along the structure and appear indoors later
Occurs after showering or cleaning the bathroom floor Bathroom waterproofing layer·drain joints·drainpipe The water supply line is also used during the same period and requires a separate inspection
Continues to spread even when no water is being used Cold-water·hot-water supply lines, heating pipes, common pipes Condensation or water remaining inside may also drip later
Water droplets form over a wide area on cold surfaces or when humidity is high Condensation, insulation defects, air-conditioning ducts·pipe insulation A concealed leak may also have increased the surface humidity
Becomes worse when hot water or heating is used Hot-water pipe·heating pipe or condensation caused by temperature differences It may occur simultaneously with waterproofing or drainage defects where hot water is used

3. Check for a Minor Leak Using the Water Meter

If the home has an individual water meter, it can provide useful information when checking whether a water supply pipe is leaking.

  1. Close all faucets in the home.
  2. Wait until the toilet tank has filled, and stop the operation of any appliance that may use water, such as the washing machine, dishwasher, water purifier’s automatic water supply, ice maker, or bidet.
  3. Check the product safety instructions before turning off the boiler or water supply equipment yourself.
  4. Photograph the meter reading and the small indicator needle or leak indicator.
  5. Do not use any water during this time. Observe it for a while, then photograph it again and compare any changes.

If the small indicator needle or reading continues to move, water may be flowing through a toilet, water-using fixture or appliance, or pressurized water supply pipe within the unit. However, this alone cannot determine the location of the ceiling leak.

You also cannot conclude that there is no leak merely because the meter does not move. Rainwater intrusion, condensation, bathroom waterproofing leaks, and drainpipe leaks may not register on the water supply meter. In buildings with shared metering or connected water tanks and booster equipment, check with the management office or the person responsible for the equipment.

4. Distinguish Among Condensation, Rainwater, Waterproofing, and Pipe Leaks

Signs Strongly Suggesting Condensation

  • Small water droplets form over a wide area on a cold ceiling, at exterior wall corners, around windows, or on uninsulated pipes.
  • It becomes worse when indoor humidity is high or the temperature difference between indoors and outdoors is large.
  • It tends to decrease after ventilation or dehumidification.
  • It is often not directly associated with changes in the water supply meter.

Even if it appears to be condensation, a concealed leak inspection is needed if a stain at a specific point continues to expand or coincides with rain or water use. Simply wiping away mold and repainting may leave the source of the moisture unresolved.

Signs Strongly Suggesting Rainwater Intrusion Through an Exterior Wall or Roof

  • It appears after rain or after strong winds drive rain against an exterior wall.
  • It often begins on the top-floor ceiling, where an exterior wall meets the ceiling, or above a window.
  • It may appear several hours or even longer after the rain stops.
  • Exterior wall cracks, window sealant, roof waterproofing, and areas around drains should be inspected together.

A water-spray test on an exterior wall may increase damage to lower floors and create electrical hazards, so it should be performed by a professional who divides the area into sections and provides drainage and protective covering.

Signs Strongly Suggesting the Bathroom Waterproofing or Drainage System

  • The downstairs ceiling becomes wet after someone upstairs showers or uses a large amount of water on the floor.
  • It may respond to water use around the bathroom threshold, drain, bathtub edge, or pipe penetrations.
  • A waterproofing problem may occur even while the water supply meter remains stationary.
  • If it appears only when water is drained from the washbasin or bathtub, the drainpipe and connections should also be inspected.

A waterproofing flood test involves blocking the drain and monitoring the water level, but the test itself may increase damage to the floor below. The scope and duration should be determined by a professional after obtaining consent from the managing entity and the occupants below.

Signs Strongly Suggesting Cold-Water or Hot-Water Supply Pipes

  • The stain may continue to expand or water may repeatedly drip regardless of whether water is being used.
  • The meter’s small indicator needle may move even after all water use within the unit has stopped.
  • A hot-water pipe leak may create a different temperature pattern from its surroundings in a thermal image, but surface temperature alone is not conclusive.
  • It may be accompanied by a drop in pipe pressure or repeated replenishment of boiler water.

Cold-water pipes, hot-water pipes, and heating pipes should be isolated from one another when checking pressure changes. Applying pressure without clearly understanding the pipe type and valve configuration may damage the equipment.

5. Review Inspection Methods and Diagnostic Records Before Construction

Each type of leak detection equipment looks for different clues. Rather than accepting an estimate that merely lists equipment names, it is important to confirm which pipes and areas were inspected and under what conditions.

Inspection Primary role Limitations and items to verify
Thermal imaging inspection Identifies areas where surface temperature differences and moisture movement are suspected It does not photograph the leak itself and may be confused by insulation defects, sunlight, or heating and cooling effects
Pressure test Checks whether isolated water supply·hot-water·heating circuits maintain pressure It can narrow down which circuit is leaking, but additional detection is required to identify the exact point
Tracer gas inspection Introduces tracer gas into an isolated pipe and searches for the area where it escapes The pipe must be properly emptied and isolated, and finishing materials and ventilation conditions may affect the results
Acoustic inspection Detects leak sounds generated in pressurized pipes Detection may be difficult depending on ambient noise, pipe material, burial depth, and minor-leak conditions
Moisture meter inspection Compares the relative extent of moisture in ceiling·wall finishes Standards differ by material, and it cannot independently determine the cause and point of origin
Flood·water-spray test Reproduces conditions involving bathroom waterproofing or external rainwater intrusion Uncontrolled testing may increase damage, so prior consultation and protective measures are required

Before agreeing to demolition or repairs, request the following records.

  • Inspection date, weather, and leak conditions at the time
  • Units·rooms·pipe circuits inspected and valve locations
  • Initial and final meter readings
  • Circuit tested, initial value, final value, and observation conditions for the pressure test
  • Original thermal images and shooting locations
  • Floor plan or photographs showing the locations of acoustic·gas inspections
  • Diagnostic opinion that distinguishes confirmed facts from assumptions
  • Minimum demolition scope, restoration scope, and conditions that may result in additional costs
  • Post-repair retesting method and whether records of the results will be provided

Do not decide to demolish an entire bathroom or extensively replace pipes based on a single equipment signal. If multiple causes are suspected, the water supply pipes, drainpipes, waterproofing layer, and external intrusion should be isolated by area and separately reproduced.

6. Preserve Evidence for the Management Office, Landlord, and Insurer

The cause of and responsibility for a leak are not determined solely by where the water appears. An investigation is needed to determine whether the defect is in privately owned piping, common piping, the exterior wall or roof, or the upstairs unit’s equipment.

  • Notify the management office of a multi-unit residential building of the time the leak was first discovered, the hazardous location, and the upstairs unit’s usage conditions.
  • Tenants should notify the landlord in writing or by message with photographs and leave a record of the emergency measures taken.
  • Rather than blaming the upstairs occupants, ask them to confirm when the bathroom·kitchen was used and request a joint inspection.
  • If an insurance claim may be possible, contact the insurer before demolition to report the incident and ask which photographs and documents are required. Do not delay emergency safety measures, but photograph the conditions both before and after demolition.
  • Keep receipts for diagnostic costs, emergency measures, repairs, drying, and restoration separately.

Coverage, deductibles, and the distinction between the cost of repairing the source of the leak and the cost of restoring the damage vary by policy. Do not assume that compensation is available merely because insurance exists; review the policy terms and the insurer’s incident-reporting guidance.

7. Items to Check Even After the Water Stops

Even if the water is no longer dripping, the inside of the ceiling may not be dry. Concealed moisture can lead to damage to finishing materials, odors, and microbial growth.

  • Confirm whether the same conditions were recreated for retesting after the cause was repaired.
  • Check whether wet insulation and ceiling materials need to be replaced.
  • During drying, record moisture measurements and measurement locations by date.
  • If mold has spread widely or contaminated water was involved, consider a professional assessment rather than simply wiping it with a dry cloth yourself.
  • Proceed with painting and wallpapering only after confirming that the cause has been repaired and the area is sufficiently dry.

A ceiling leak may involve condensation and leakage at the same time, or defects in both the waterproofing layer and piping. Even if the symptoms disappear after a single surface repair, the original conditions should be recreated to determine whether the problem recurs.

Sign-in required

Sign in with your Google account to like, comment, and save highlights.

Images

A man inspects the breaker panel while water leaks through the ceiling around a light fixture.
A leaking ceiling is assessed using moisture patterns, plumbing checks, weather history, and diagnostic tools.

FAQ

What should I do first if water is dripping from the ceiling?

First, check whether the water is near lights, wiring, or fire detectors, and do not touch wet fixtures. Turn off the circuit breaker only if you can do so safely from a dry area. If the electrical panel is wet or there is a risk of electric shock or fire, do not approach it; check the official guidance from the relevant emergency authority or contact the building management office.

Is the place where the water is dripping the actual source of the leak?

Not necessarily. Water can travel along slabs, beams, the exterior of pipes, and the inside of the ceiling, so the cause may be an exterior wall, bathroom, or pipe located away from the water stain.

If the water meter is not moving, does that mean it is not a plumbing leak?

It may make a water supply pipe leak less likely, but it does not rule out a leak itself. Leaks from a bathroom waterproofing layer or drainpipe, rainwater intrusion, and condensation may not cause any change in an individual water supply meter.

How can I distinguish condensation from a leak?

Condensation tends to form many small droplets over a broad area on a cold surface and is affected by humidity and temperature differences. In contrast, a leak may correspond with rain or water use in a specific area, or a stain in one spot may continue to grow. However, both can occur together, so documentation and inspection are necessary.

If water leaks after the rain has stopped, could it still be a problem with the exterior wall or roof?

Yes. Rainwater can travel through the waterproofing layers of exterior walls and roofs and through the building structure before appearing indoors later, so record when the rain started and stopped, the wind direction, and the time the leak appeared.

Can a bathroom waterproofing layer leak be identified using the water meter?

In general, water that passes through a waterproofing layer has already gone through the meter and been used, so it is difficult to identify such a leak solely by checking the meter while all water outlets are turned off. A reproduction test under different bathroom-use conditions or a controlled water ponding test may be necessary.

Can a thermal imaging camera confirm the location of a leak?

Thermal imaging is an auxiliary method for identifying a suspected area where surface temperature differences occur. Missing insulation, sunlight, heating and cooling, and humidity can create similar patterns, so the results must be interpreted together with pressure, moisture, and acoustic tests, as well as on-site conditions.

What should I do if a leak detection company immediately recommends removing the ceiling?

Unless it is an emergency safety measure, first request written documentation of the inspection location, measurement results, basis for the assessment, and the minimum area to be removed. If an insurance claim may be possible, it is also advisable to check which photos and documents the insurer requires before removal.

Is the upstairs unit always responsible for water leak damage?

No. The cause may be not only equipment in the upstairs unit's private area, but also shared piping, the roof, exterior walls, windows and doors, or a defect in the building itself. Until the diagnostic results and the building's maintenance responsibilities are confirmed, it is difficult to determine liability based solely on where the water appeared.

Can I reapply wallpaper as soon as the water stops?

You should do so only after confirming that the cause has been repaired and the inside of the ceiling and the finishing materials have dried sufficiently. If wet insulation or drywall remains, stains, odors, and mold may recur.

Sources

Also available as video and a short read

Videos and a short write-up made from this content. Watch instead of reading, or skim the gist first.

Short version

Loading…

Data formats

This content is available in several machine-friendly formats.

Data-only languages (machine translated, files only)

Indonesian JSON MD Portuguese JSON MD Chinese (Traditional) JSON MD Deutsch JSON MD

Verification

Reviewed by 신익희 · 편집장 · 2026-09-03

Figures in this article were checked against the source material during generation. 3 correction(s) applied. · 2026-09-03

This translation has been cross-checked by AI. · 2026-09-03

Reuse & AI usage

Search indexing and AI citation with attribution are welcome. See the license policy for details.

CC BY · License

Loading…

Loading…

Related content

From Injoys

Request the content you want and take 70% of what it earns

Just leave the subject. We handle production, review, translation and distribution.

See how revenue sharing works

Comments